Concurrent Camera Access in CiV
This tutorial explains a camera mediation solution.
Camera mediation overview
To overcome the camera sensor hardware resource limitation of only one application being able to use the camera at a time, we’ve developed a camera sharing solution. With this solution, the preview data is shared and available to the host OS and a guest OS in a secure manner.
Camera mediation support in CiV
We provide a virtual camera service to enable multiple v4l2loopback virtual nodes. These nodes are created during device bootup, and all these nodes are available and capable of streaming data in MJPEG or YUV format. These nodes can be used by multiple host applications as well as multiple guest OSes for simultaneous camera operations.
We provide a host camera service that runs in the user space of Ubuntu and enables an interface between the v4l2looback device nodes and the guest via vsock.
The camera vhal on the guest is a generic virtual HAL developed to interact with the host camera service to get camera data and provide the camera content to the existing camera services in Android OS.
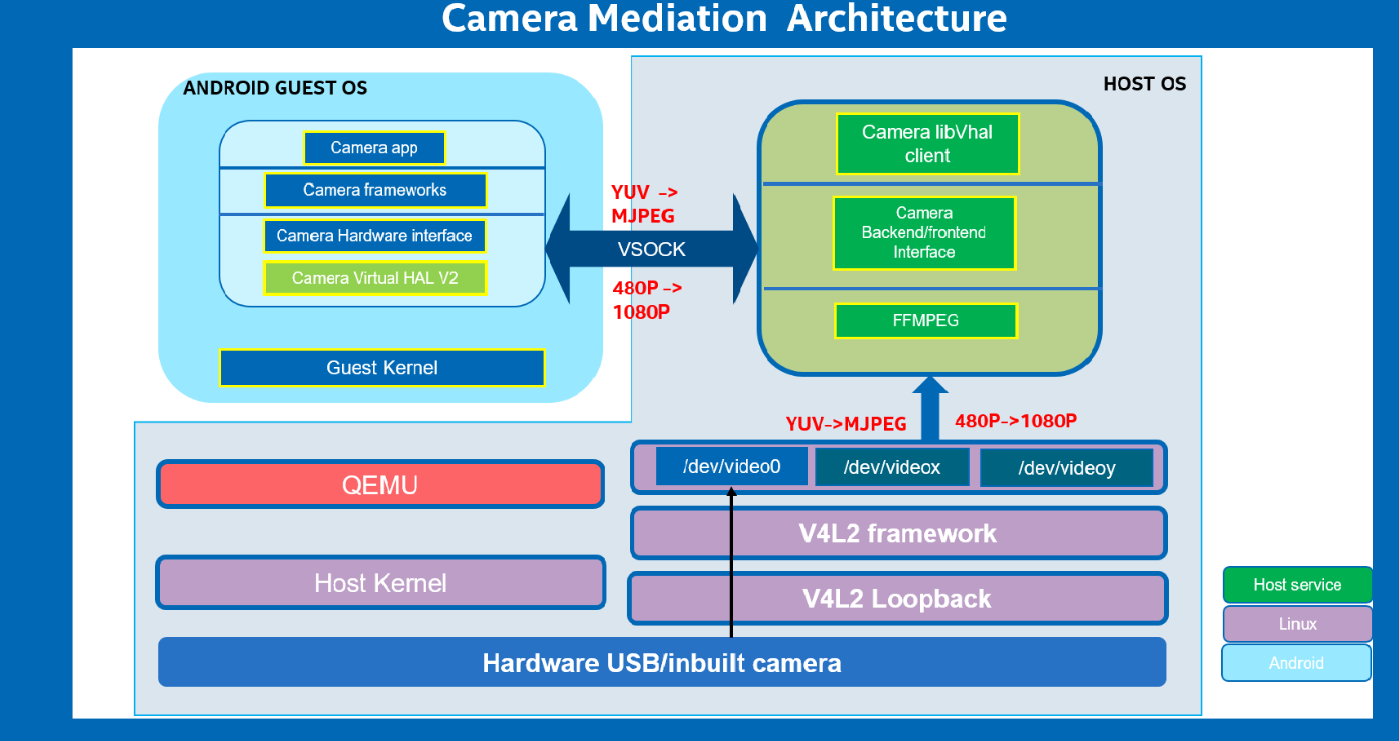
Figure 1: Block diagram of camera mediation in CiV
Figure 2 below is a screenshot of the host and guest camera applications sharing the same camera resource simultaneously.
ffplay is the host application using the virtual camera node
/dev/video6.
AOSP on an Intel platform is the Celadon in virtual machine running on
the guest OS, using the virtual camera node /dev/video7.
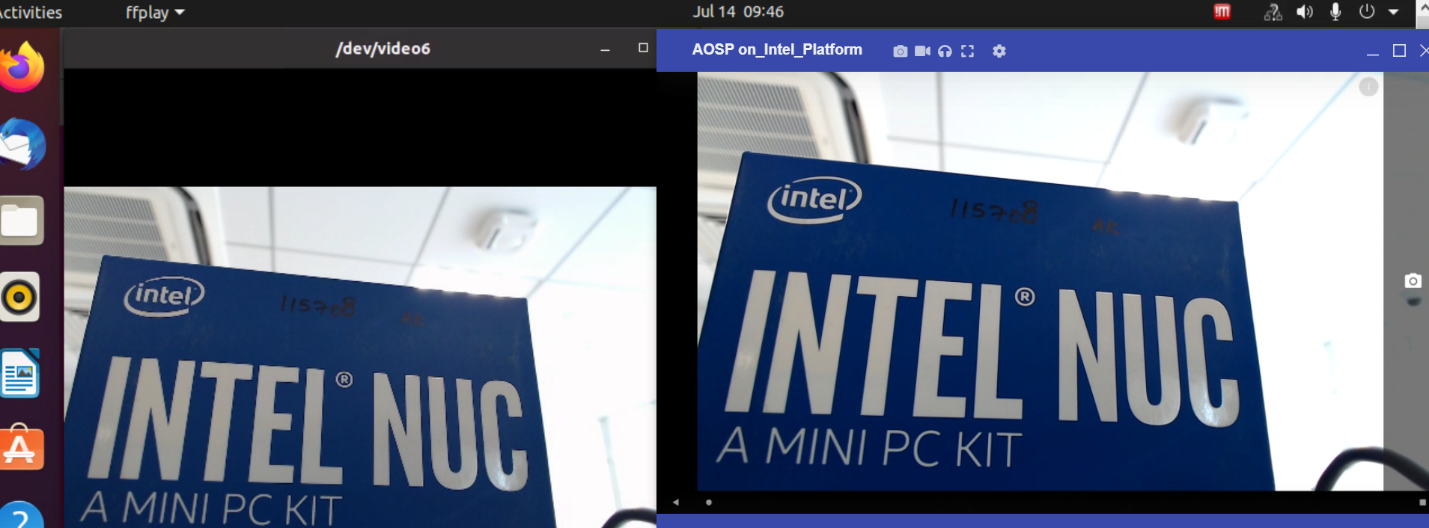
Figure 2: Concurrent camera access on host and guest OS
Enabling camera mediation in CIV:
Run the setup host script to install the host camera server and Intel virtual camera service.
sudo -E ./scripts/setup_host.sh
After a successful execution of setup, two host virtual nodes are generated:
/dev/video6and/dev/video7Set the maximum supported resolution for the video0 node using the following command:
sudo v4l2-ctl -d /dev/video0
--set-fmt-video=width=1920,height=1080,pixelformat=MJPG
To know your camera’s supported resolution and format, run the following command:
sudo v4l2-ctl -d /dev/video0 --list-formats-ext
Modify the
~/.intel/.civ/instance.inifile by adding:camera_med=y
Before starting Android, make sure virtual device nodes
/dev/video6and/dev/video7are present with host OS. If not, re-run this command:sudo –E ./scripts/setup\_host.shLaunch Android using vm-manager -b instance. This starts the host camera service.
Camera USB passthrough limitation
The camera sensor is a hardware resource that can be used by only one application at a time; in a virtualized environment, only one running OS can use the camera.
If there are cases where image processing or IA operations need to be done on the data before rendering the image, then the developer/consumer must intercept preview data for such operations.
This problem exists even with a virtualization environment as the camera can be used only on the host or in one of the guest OSes. With this limitation, it’s hard to make the best use of virtualization.
Known Issues:
The camera service implementation is only for a single camera.
Camera hot plug is not supported.